Private Installation Guide
Private installation is the action of installing a version of your add-on to your own seller account. After a version of the add-on is privately installed you will be able to interact with it in the dashboard. Note that other sellers will not have access to a privately installed version of your add-on.
How to private install an Add-on
Step 1: Upload the Add-on with the CLI
Once you have a version of your addon code/assets ready, you can upload it to the Square servers using the square-cli add-ons upload command.
To learn more about the command and the flags it accepts you can run square-cli help add-ons upload.
square-cli help add-ons upload
Each upload must have a unique semantic version number which is extracted from your project’s manifest.json file. Before uploading make sure that you updated the version field in the manifest. If you reuse a version of an existing upload the upload operation will fail.
Example error
Error: Semantic version '0.0.0' already exists for add-on

Update the 'version' field in manifest.json to a unique value and try again.
Example manifest.json
{
  "version": "1.2.3"
  ...
}
Run square-cli add-ons upload and follow the prompts.
square-cli help add-ons upload
Output:
? This will upload your Add-on to Square for hosting. The add-on will not be published to sellers yet, but assets will be hosted in a public CDN. Do you want to continue? (Use --yes or -y to skip this prompt) yes
? Please add your Square API personal access token. This is accessible from the Square Developer Console: https://developer.squareup.com/console/apps ********
Preparing to upload...
Validating manifest.json...
[tsc] Starting up tsc...
vite v5.1.6 building for production...
✓ 8 modules transformed.
dist/.vite/manifest.json             1.23 kB │ gzip:  0.26 kB
dist/merchant-details-_ST9k2NV.mjs   0.44 kB │ gzip:  0.28 kB │ map:  0.86 kB
dist/modal.es.js                     0.64 kB │ gzip:  0.39 kB │ map:  0.91 kB
dist/customer-view.es.js             1.84 kB │ gzip:  0.71 kB │ map:  3.87 kB
dist/item-view.es.js                 2.68 kB │ gzip:  0.99 kB │ map:  5.20 kB
dist/home-widgets.es.js              2.68 kB │ gzip:  0.98 kB │ map:  5.01 kB
dist/blade.es.js                     6.97 kB │ gzip:  1.36 kB │ map:  8.15 kB
dist/react.es-auABP1Cy.mjs          81.86 kB │ gzip: 20.67 kB │ map: 88.97 kB
✓ built in 199ms
[tsc] tsc process completed!
[build] Build complete! Your add-on is ready for packaging.
Uploading your add-on to Square Developer Console...
Upload completed successfully. Your add-on is now available in your Square Developer Console: https://developer.squareup.com/console/apps/
Open the Square Developer Console and then the app that corresponds to your Add-on.
Open the “Add-Ons” tab from the left panel. You’ll see your uploaded Add-on under Builds.
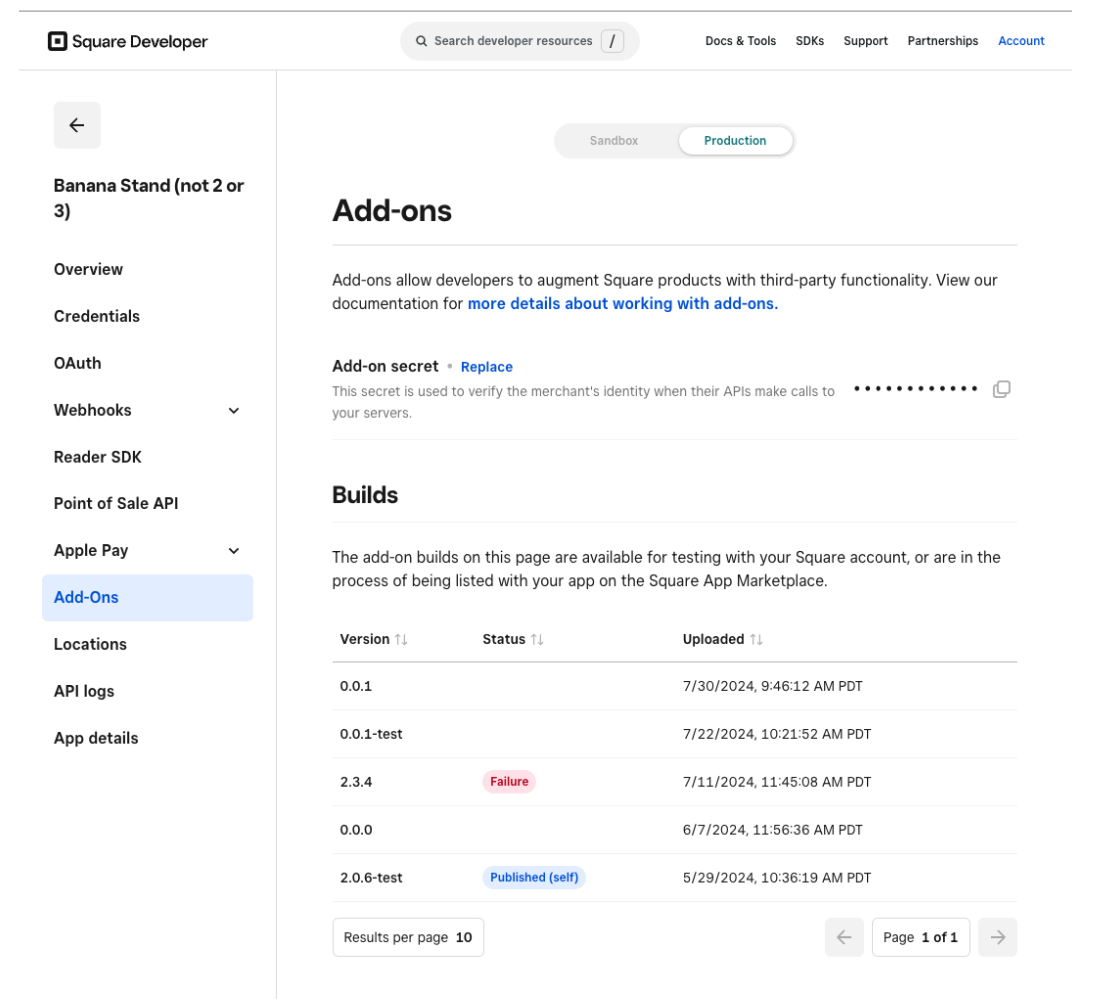
Situations in which you don’t see the Add-on:
-
If the status of the upload says “Processing”, wait for a few seconds and refresh the page.
-
If the status switches to “Failure” see Troubleshooting
-
If the status switches to an empty state, then the upload was successfully processed and ready to be installed on your account.
Step 2: Installing the Add-on on your account
Click on the Add-on build and select Actions > Install (self). You should see a confirmation message, and the status of the build changed to “Installed (self)”.

You’ll also see the list of Dashboard placements that your Add-on supports.
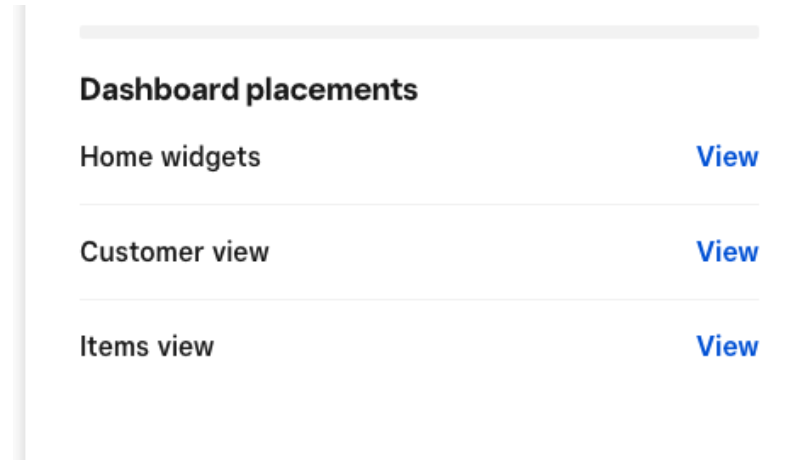
Select a placement and click “View” to navigate to that placement.

Step 3: (Optional) Uninstall the Add-on
If you would like to uninstall your build click on the build and select Actions > Uninstall (selfl). You should get a confirmation message and the status of the row should switch from “Installed (self)” to an empty state.

How to troubleshoot issues uploading and installing
If you are not sure why the upload command is failing, try running the command in verbose mode to get more detailed logs:
square-cli add-ons upload --verbose
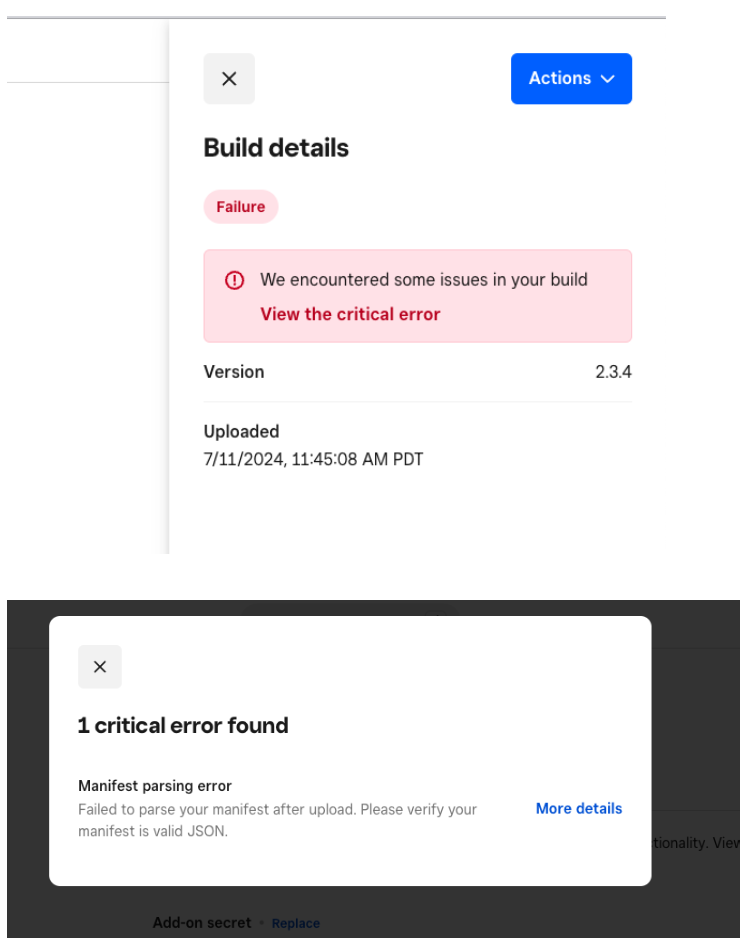
If the upload command is succeeding but the status of the upload is “Failure” in Square Developer > Add-Ons to get more details about the failure click on the failed build and then click on “View the critical error”.
How to upload as a poweruser
If you want to skip the prompts when running the upload command, you can accelerate your workflow by adding two flags:
-
-t=<access_token>allows you to provide your access token via a flag instead of a prompt -
-ymakes the command skip all yes/no prompts